Overview
The Viewer/Editor tab is where you look inside a .bidx bid file and change it. Open a file, pick a region, site, or unit from the tree on the left, and the tab shows that unit's bids as a bid stack — a grid where each row is a band (a price/quantity pair the unit is willing to sell at) and each column is a time slot.
Use this tab when you need to review the bids on disk or edit them, whether you are adjusting a single unit or shaping a whole region or site in one action. This page describes each feature grouping as reference material:
- Prerequisites
- Glossary
- Interface and Navigation
- Saving Options
- Unit-level Editing
- Regional and Site-level Editing
Viewer and Editor
The Viewer/Editor tab lets you view the bid stack and graph per region, site, or unit, and change the bids using the editing tools inside the bid stack.
Tabs
The right-side panel has three tabs:
- Detail — a read-only properties grid for the selected node. Selecting a unit shows its DUID, Name, Site, Region, MwMax, MwMin, MwReg, MLF, Fuel, ROC, and Status, plus a Bid Summary section. Selecting a site shows SiteID, Name, Region, Portfolio, Fuel, Capacity, MLF, and SRMC. Selecting a region shows RegID, Name, Pool, MaxPrc, and MinPrc. When no node is selected the pane reads Select a node in the tree to view its properties.
- Bid Stack — the editable bid grid: dispatch intervals across the columns, bands down the rows. Navigation and editing tools are described in the Features and Functionalities section below.
- Graph — the supply bid stack chart: a stacked-area chart with time along the x-axis and cumulative MW on the y-axis, one area series per bid band. Cheaper bands stack at the bottom; each band's colour matches the price-tier colour used in the Bid Stack grid. An availability-cap line is overlaid as a separate series.
Toolbar
The file toolbar at the top of the page has seven actions:
- New — opens the new-file dialog to create a fresh
.bidxfile. If a file is already open with unsaved edits, a confirmation dialog appears before proceeding. - Open — opens a file picker to load an existing
.bidxfile. - Save — writes all edits back into the currently-open file. Disabled until a file is open. Described in the Features and Functionalities section below.
- Save As — writes to a new file path, leaving the original file unchanged. Disabled until a file is open. Described in the Features and Functionalities section below.
- Submit — copies the current
.bidxfile to the configured submit folder (the iPool bid pickup location). Disabled until a file is open. - Export — exports the energy-offer data from the open file to a CSV file at a path you choose. Disabled until a file is open.
- + Choose Sites/Units — opens a site picker to add a site or unit from the loaded source database into the open file. Disabled until a file is open.
Prerequisites
- A
.bidxfile must be open. A.bidxfile is the bid file the tab reads, edits, and writes; it holds a set of bids for a period plus a short block of identifying metadata. Until a file is open, the header buttons Save, Save As, Submit, and Export stay disabled. - A node must be selected in the tree on the left. The tree groups the
units in a region-site-unit hierarchy: a region contains sites, a site
contains one or more units, and each unit is a single generation or load
resource identified by a short code called a DUID (Dispatchable Unit
IDentifier). With nothing selected, the Bid Stack tab shows
Select a node in the tree…. - Unit-level editing tools require a unit selection. Selecting a region or site instead swaps the single-unit toolbar for the cascade panel described in the Regional and Site-level Editing tab.
Features and Functionalities
- Interface and Navigation
- Saving Options
- Unit-level Editing
- Regional and Site-level Editing
These features control how the bid stack is displayed and how you find your way around it.
Set Dispatch Type
The Bid Stack tab shows the bids across the day in either 5-minute view
or Hourly view. In 5-minute view there are 288 columns across the day —
one per five-minute time slot, or dispatch interval; in hourly view there
are 24. A resolution toggle sits next to the "Jump to time:" selector at the
top of the bid stack. Its face reads 5-min view or Hourly view depending
on the current setting, and clicking it flips between the two.
This is purely a display setting. It does not change what the file
records and it never writes to disk — it only changes how densely the tab
draws the columns for you. The file's own dispatch interval (5-minute or
hourly) is decided when the file is created and is read-only in the
Viewer/Editor: you cannot change it from this tab. You can confirm the file's
own dispatch interval alongside Market, Intervals/day, and Bands under
Settings → Bid Resolution, where it carries a read-only marker.
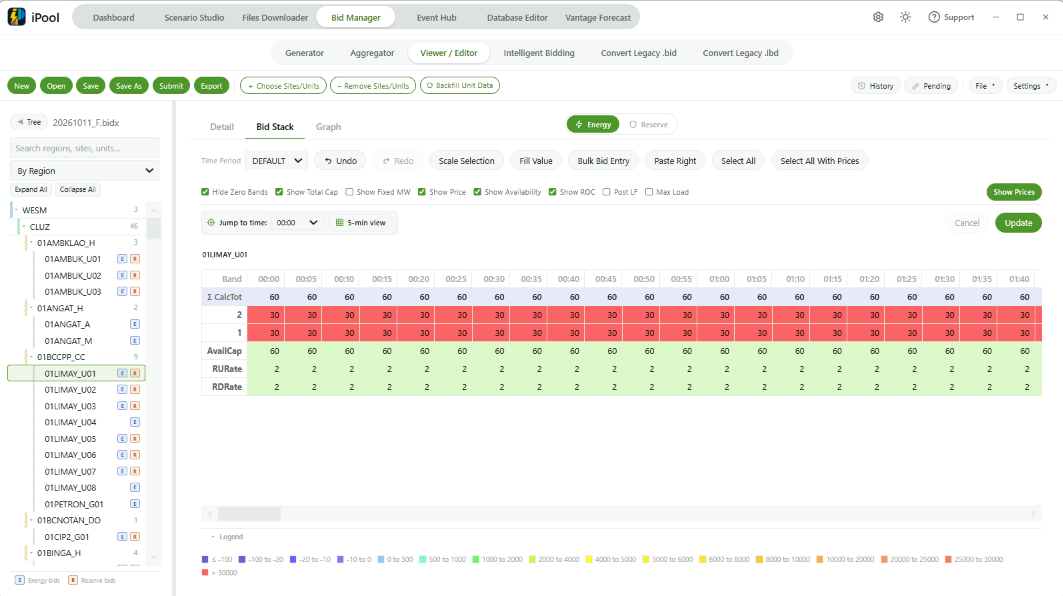
Time Period
A selector at the left of the Bid Stack toolbar. Use it to choose which time period to view in the bid stack. The selector is labelled Time Period on the toolbar.
Jump to Time
A time-of-day selector at the left of the Bid Stack toolbar. It lists every
valid time slot at the current view resolution — the 288 five-minute slots
(00:00 … 23:55) in 5-minute view, or the 24 hourly slots
(00:00 … 23:00) in hourly view. Pick one and the tab scrolls that column
into view so you can find and edit it without dragging the grid sideways.
Available whenever a unit's bids have loaded.
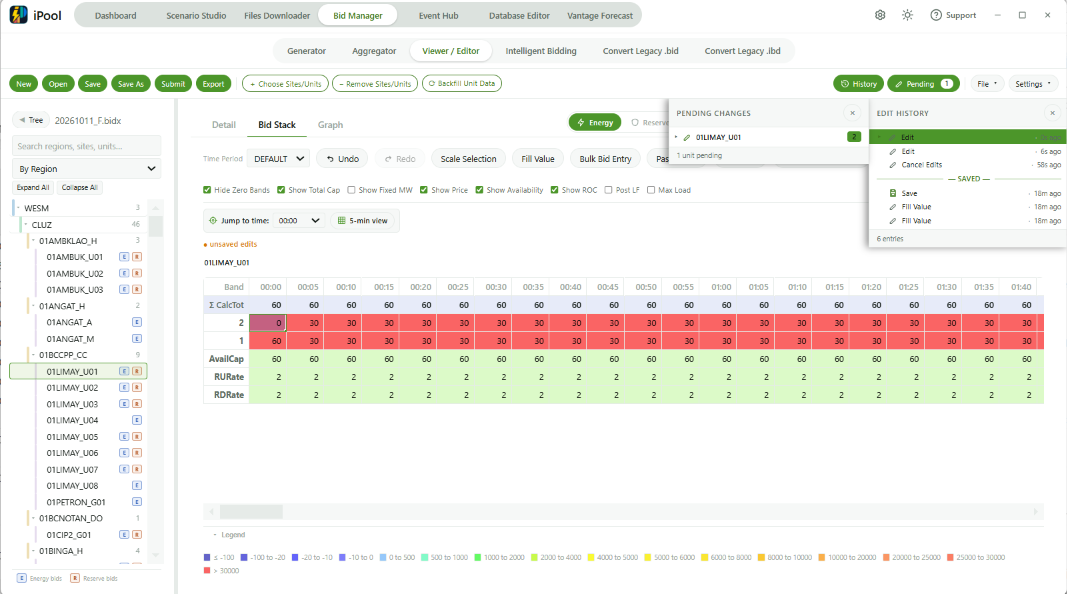
Undo / Redo
Two buttons in the Bid Stack toolbar. Undo reverses the last edit you made to the unit's bid stack; its tooltip names the action that will be undone (for example, Undo (Edit band 3)). Redo re-applies the last action you undid; its tooltip names the action that will be re-done. The buttons are active whenever there is an edit to undo or an undone edit to redo.
Use Undo and Redo for quick, one-step corrections. To step back multiple changes at once, open the Edit History drawer (see below) and click the entry you want to return to.
Edit History
Opens the Edit History drawer on the right side of the tab. Toggle it
from the History button in the header (also available as
View → Show Edit History in the menu bar, or with Ctrl+Shift+H). The
drawer lists every change you have made in this session — individual cell
edits, bulk edits, imports, cancelled edits, validate check-points, Save,
and Save As — newest at the top, with a — Saved — divider marking which
entry currently matches what is on disk. Click any row to jump the tab back
to that point in the timeline; if the row belongs to a different unit, the
tab switches the tree selection and Bid Stack view for you.
Use this when you want to see a summary of what you have done so far in a session, or when you want to step back to an earlier state without individually undoing changes one by one.
Pending Changes
Opens the Pending Changes drawer on the right side of the tab. Toggle it from the Pending button next to History in the header. The drawer lists one row per unit that currently has unsaved edits — the unit's DUID, the day-block label (when a non-default block is loaded), and a count of how many time-intervals in that unit have unsaved changes. Click a row and the tab selects that unit in the tree and opens its bid stack so you can Update or Save it.
Use this to check, before saving, exactly which units you have changed. When there are unsaved edits, the header Pending button carries a number badge showing the total count, so you always know at a glance whether anything is waiting.
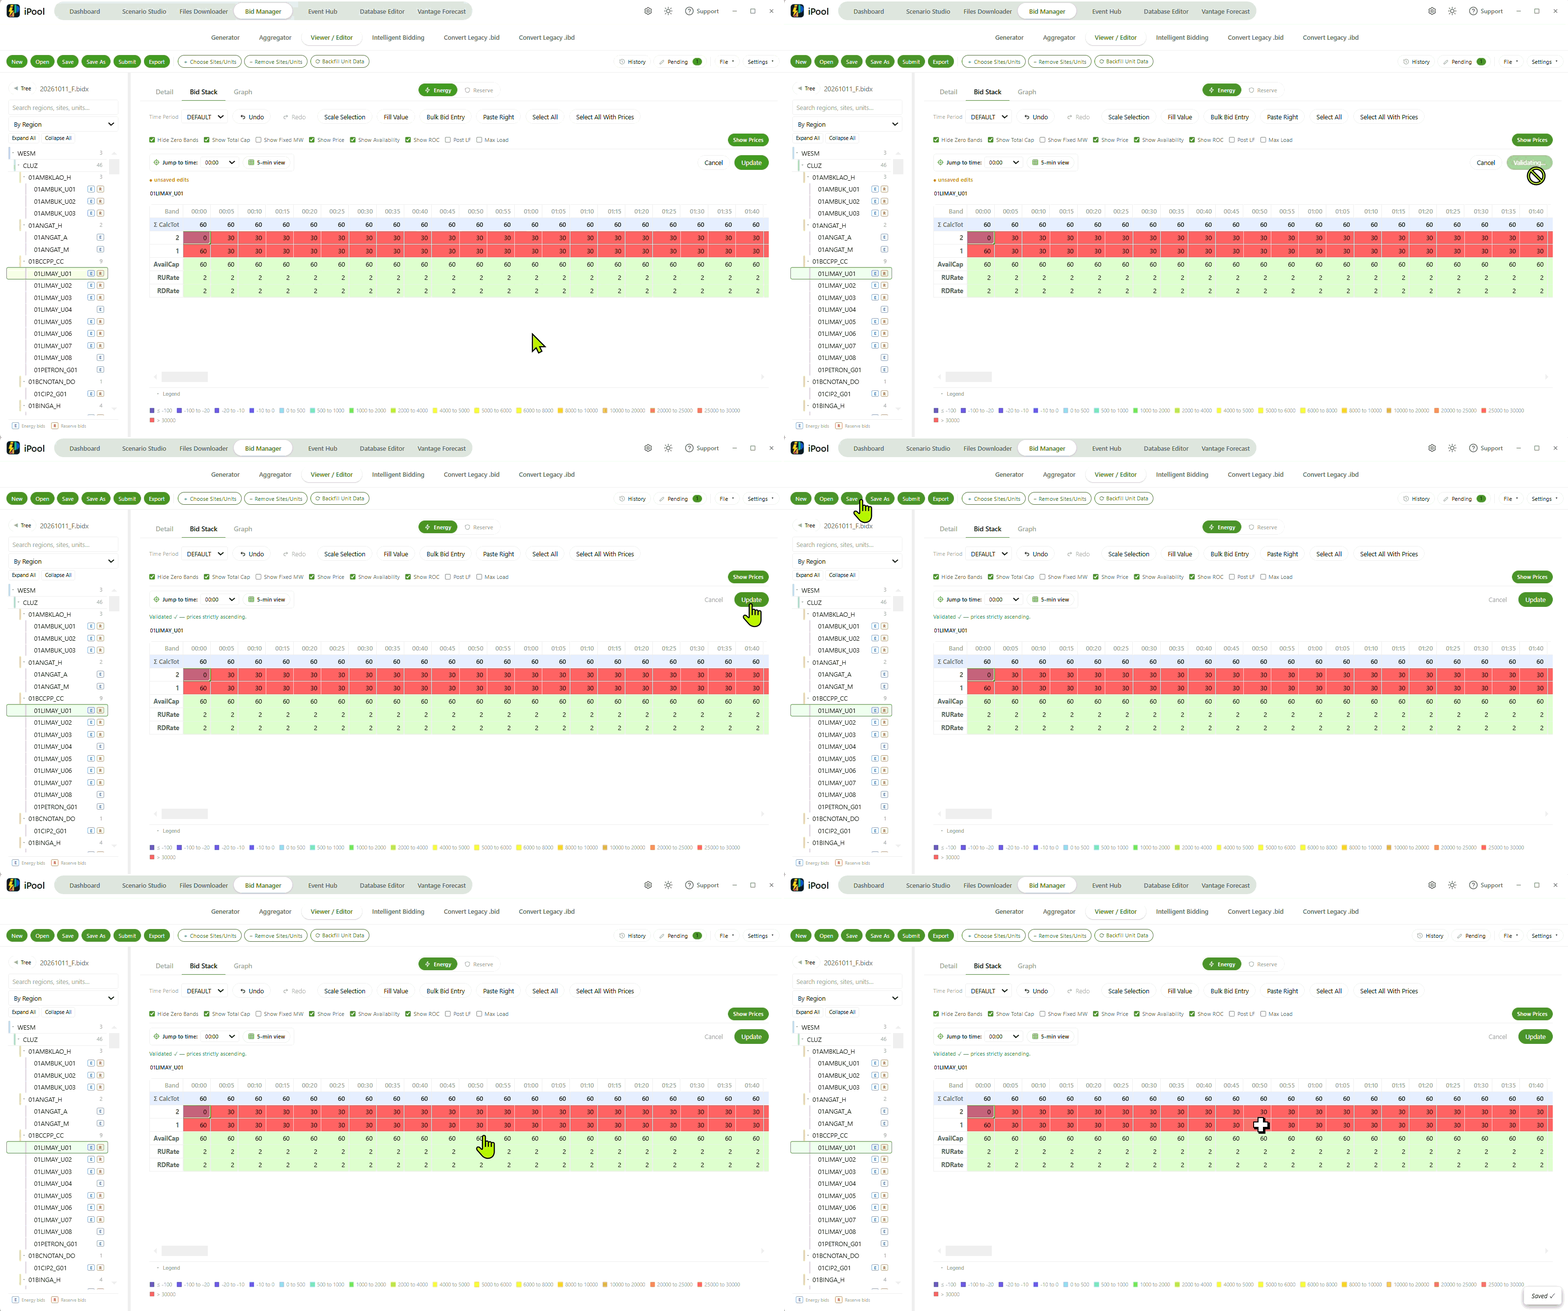
These are the three ways to commit your work. New users often mix them up — understanding when to reach for each is one of the most useful things to learn about this tab. Update, Save, and Save As also apply to bids that arrived by imports or other routes; in a typical editing session you would reach them after making the edits described in the Unit-level Editing and Regional and Site-level Editing tabs.
Update
Click Update after you have finished editing a unit but before you save
the file. Update runs a quick internal check — it makes sure the unit's
prices still go from cheapest to most expensive down the bid stack, and it
flags any row that broke the order. Update does not write anything to
disk; the file on disk is unchanged. If the check passes, the tab reports
Validated ✓ — prices strictly ascending. and clears the unit's
unsaved-changes marker (the edits are not saved to disk until
you Save). If the check fails, the offending rows are listed inline so you
can fix them before saving. Equivalent to Edit → Validate Bid Stack in the
menu bar.
Save
Click Save to write your edits into the file you have open, overwriting the previous version. Save covers every unit you have edited in this session, not just the one currently on screen. If you have unsaved edits or unresolved validation issues at the moment you click Save, a confirmation dialog opens listing what you are about to commit and asks you to confirm — the file itself is not touched until you confirm.
Use Save when you are happy with your edits and want them in the same file
you started from. On success the tab shows Saved ✓.
Save As
Click Save As when you want to keep your edits but leave the original file alone. A file picker opens; choose a new name and location and the tab writes a fresh bid file at that path and then makes that new file the one you are working on. Save As does not show the confirmation dialog Save shows — you are writing to a fresh file, so nothing existing is being overwritten. Any earlier undo entries stay linked to the original file, so if you undo across the Save As you may see a message about the earlier file rather than the new one.
Use Save As when you want a safety copy before running a destructive transform (see the Regional and Site-level Editing tab for the transforms that need this), when you are producing a variant of the original for comparison, or any other time you want the original file to stay untouched.
The six tools in this tab appear only when a unit is selected in the tree.
Each one acts on the unit you are looking at, keeps your changes until you save,
and can be reverted with a single Ctrl+Z. Nothing is written to disk
until you click Save.
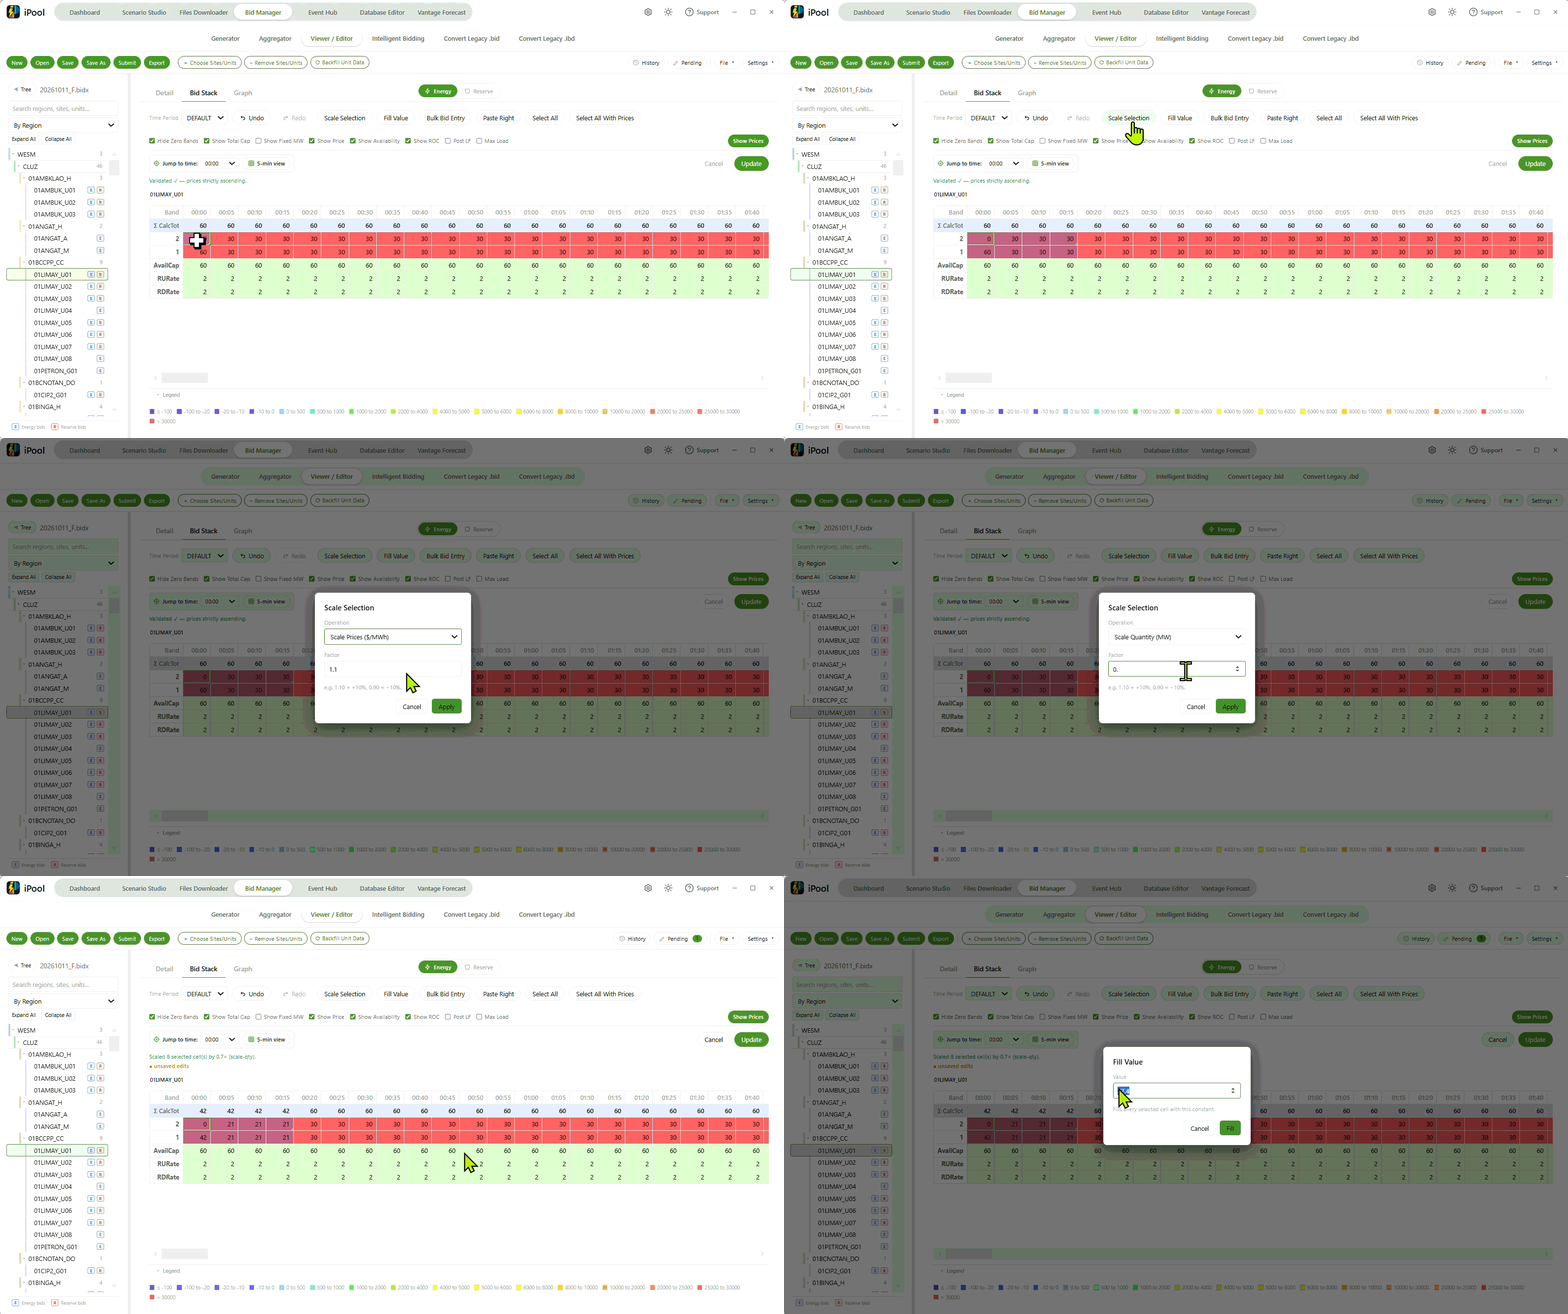
Scale Selection
Opens the Scale Selection dialog. Choose an Operation — Scale Prices ($/MWh), Scale Quantity (MW), or Scale Availability Cap (MW) —
and enter a Factor (for example 1.10 for +10 %, 0.90 for −10 %).
Despite the name, the operation applies to the whole unit's profile,
not just the cells you selected in the grid.
Scale Prices ($/MWh)multiplies every band's price by the factor.Scale Quantity (MW)multiplies every band's MW quantity by the factor and rounds the result down to the nearest whole MW.Scale Availability Cap (MW)multiplies each time-interval's availability cap by the factor and rounds down. The availability cap is a per-interval limit that sits alongside the band stack rather than inside it.
Use Scale Selection when you want to shift a unit's whole bid profile up or
down proportionally — for example to reflect a change in the unit's expected
running cost, or to reduce quantities across the board when the unit is
de-rated. A factor of exactly 1.0 does nothing (no history entry is
recorded).
Fill Value
Opens the Fill Value dialog. Enter a single Value and click Fill, and the tab writes that value into every cell currently selected in the grid. If you have MW cells selected, the value goes into those MW cells (rounded to the nearest whole MW). If you also have the price ladder selected (from a prior "Select All with Prices"), the same value goes into the selected prices as well. Nothing happens if you have selected no cells.
Use Fill Value when a run of intervals should carry the same MW or the
same price — for example setting an overnight block to a single quantity,
or setting a range of intervals to a floor price. After filling, the
toolbar reports Filled N cell(s) with V..
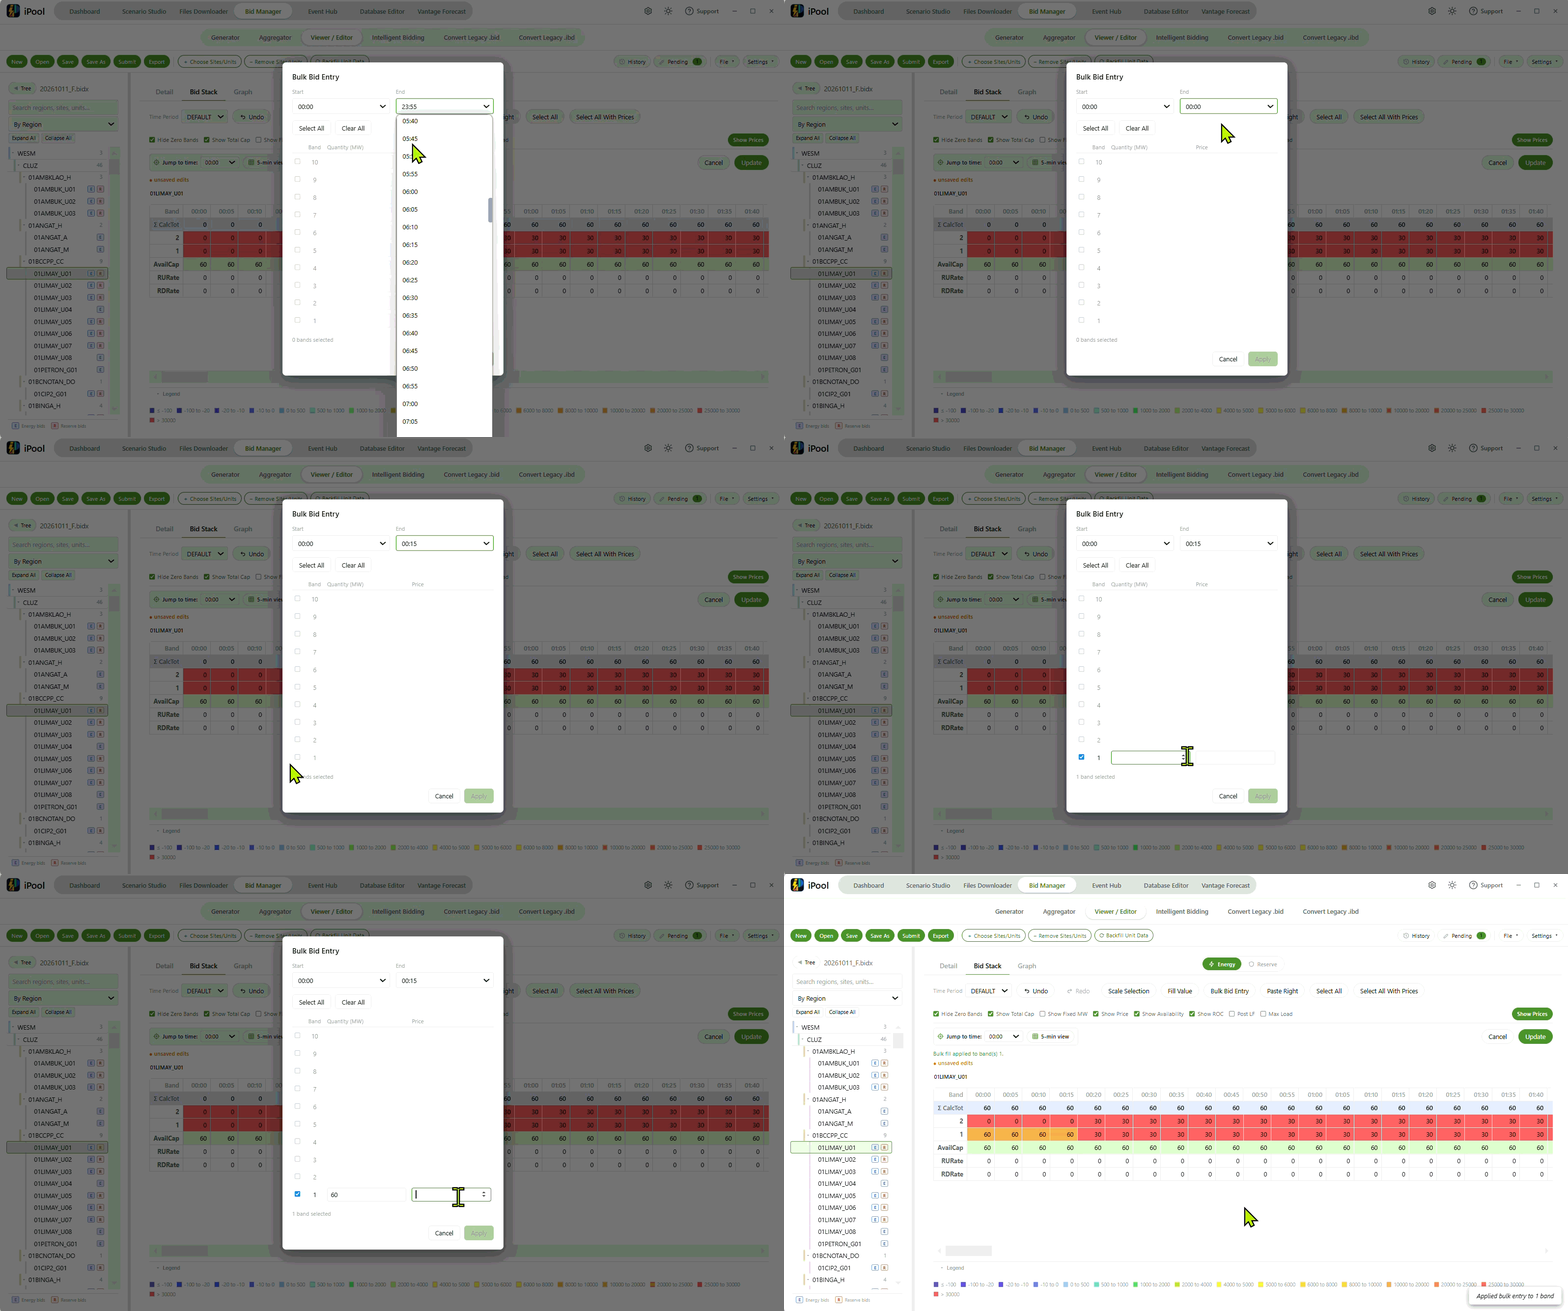
Bulk Bid Entry
Opens the Bulk Bid Entry dialog and writes the same price and quantity into a rectangle of the grid. Four inputs are required.
- Bands — ten checkboxes, one per band. Choose which bands to fill.
- Start and End — a start and end time on the five-minute clock. Both must line up to a five-minute boundary, and End must be at or after Start.
- Quantity (MW) — the MW value to write into every chosen (band, interval) cell.
- Price — the price to write into the same cells.
Click Apply. Every cell inside the rectangle formed by the chosen bands across Start to End inclusive is filled with the entered MW and price. Bands are chosen from the dialog itself, not from the current grid selection.
Use Bulk Bid Entry when a fixed price/quantity offer should apply to several bands over several intervals — for example, offering the same price and quantity on bands 3–5 for a whole overnight block.
Paste Right
Paste Right takes a value you have already copied with Ctrl+C and
tiles it rightward from the currently-selected cell to the end of the day,
along that one band. There is no dialog. Only MW is pasted (rounded to the
nearest whole MW); there is no "Paste Right" equivalent for prices.
Use this to extend a value along the day — for example, once you have set
band 5 to 50 MW at midday and confirmed it is right, Paste Right copies
50 all the way to 23:55 on that same band.
The toolbar messages tell you when a pre-condition is not met. Select a target cell first — click one MW cell to choose where Paste Right lands.
means you clicked Paste Right without a target selected. Select a single row — Paste Right tiles across ONE band, so exactly one row must be selected. means the current selection spans more than one band. Copy something first (Ctrl+C) — the clipboard is empty, so there is nothing to paste. means the clipboard is empty. On success the toolbar reports
Pasted into N interval(s) on band B..
Select All
Selects every editable MW cell across every band (1 through 10) at every
displayed column, ready to be edited by Fill Value or scaled by Scale
Selection. Read-only rows — the summary row at the top of the grid and the
fixed / cap / ROC auxiliary rows — are left out. There is no dialog. The
toolbar reports Selected N MW cells..
Use Select All when the edit you are about to make should apply to every cell in the unit — for example to fill every MW cell with the same starter value before shaping the bid.
Select All with Prices
The same as Select All, but also adds the unit's price ladder — one price per band — to the selection. The price ladder is the vertical column of representative prices next to the band numbers. A subsequent Fill Value therefore updates both the MW cells and the prices for those bands.
Use this when you want to reset both the quantities and the prices in a
single action. The toolbar reports Selected N MW cells + prices..
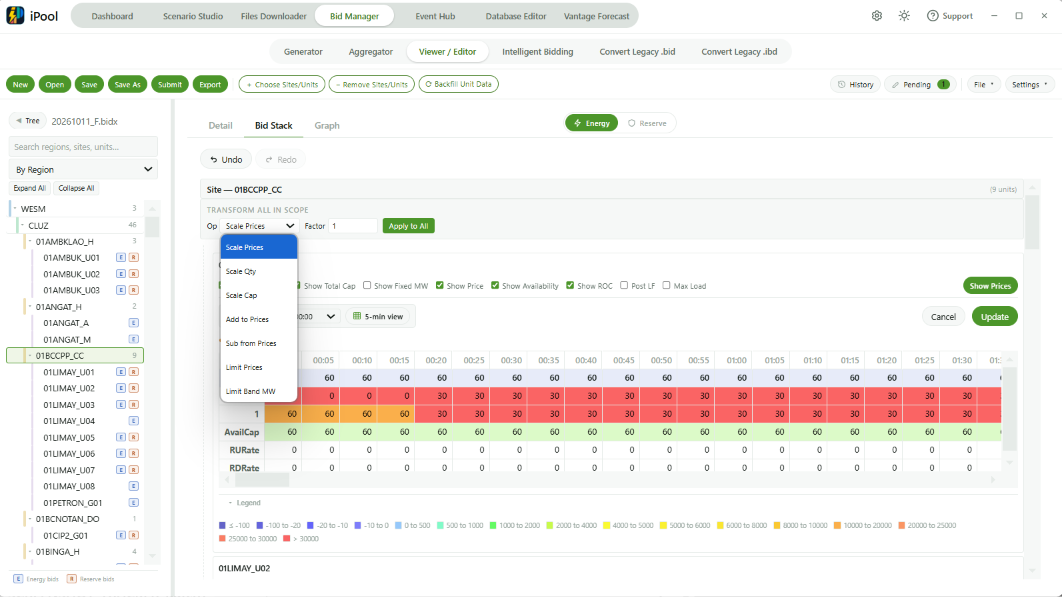
The seven transforms in this tab appear only when a region, zone,
or site is selected in the tree. They are grouped under the
"Transform All in Scope" panel at the top of the tab. When you apply
one, the tool runs it against every unit inside your selection
independently and writes the results directly into the .bidx file. There
is no Save step for these transforms — clicking "Apply to All" commits them
straight to disk. On success the tool reports Transformed N DUID(s).
Scale Prices
Multiplies every band's price by the factor you enter, for every unit inside your selection. Use this when you want to shift a whole region or site's price levels proportionally — for example a 10 % across-the-board price increase — with one action.
Scale Quantity
Multiplies every band's MW quantity by the factor you enter, for every unit inside your selection, rounding each result down to the nearest whole MW. Use this to scale generation up or down across a region or site without editing each unit by hand. The panel labels this transform "Scale Qty" on screen; on this page it is the same feature as Scale Quantity.
Scale Cap
Multiplies each time-interval's availability cap by the factor you enter, for every unit inside your selection, rounding down. The availability cap is a per-interval limit on how much the unit is offering in total; it sits alongside the band stack rather than inside it. Use this when the operational availability of a fleet has shifted uniformly — for example a maintenance de-rating that applies across a site.
Add to Prices
Adds the value you enter to every band's price for every unit inside your selection. A positive value raises prices; a negative value lowers them. Use this when you want to shift a family of bids up or down by the same amount — for example to reflect a fuel-cost change that applies across a region.
Add to Prices does not check the result against any market cap or floor; a large positive value can push a price above VOLL, and a large negative value can push a price below VOLG. This transform is reversible: if you added 100, subtracting 100 gets you back to where you started (tiny floating-point rounding aside).
Sub from Prices
Subtracts the value you enter from every band's price for every unit inside your selection, then re-sorts each unit's bands so the price ladder still runs from cheapest to most expensive after the subtraction.
The re-sort is what makes this transform destructive: after Sub from Prices, the pairing between prices and quantities inside a unit has been reshuffled — the quantity that used to sit on band 1 may end up on band 3, and there is no way to reconstruct the original pairing from what is now in the file. Your original values cannot be recovered — save a copy first. If there is any chance you will want the original numbers back, use Save As before running this transform.
Use this when you know the file needs a downward price shift AND you are prepared to accept the re-sort that follows.
Limit Prices
Clamps every band's price into the range you enter — an upper cap VOLL
and a lower floor VOLG, both required (see the Glossary above). Any
price above VOLL is reset to VOLL; any price below VOLG is reset to VOLG.
Prices already inside the [VOLG, VOLL] range are left alone. Use this
transform to bring a bid file inside a market's allowed price band before
submitting it.
Limit Prices is destructive: any price that was originally above VOLL or below VOLG is permanently overwritten with the boundary value, and the original number cannot be recovered from the file. Your original values cannot be recovered — save a copy first. If you might want the originals back, use Save As before running this transform.
Two bands that both got clamped to the same boundary now share the same price, which the Update check flags as an ordering issue (the check requires strictly ascending prices). If you plan to Save the file afterwards you may need to adjust those bands so the ladder is strictly ascending again.
Limit Band MW
Caps the total MW a unit can offer in any single time-interval. For each interval where the sum of the unit's positive-MW bands is above your cap, the transform scales those bands down proportionally so their sum fits under the cap. Intervals whose total is already below the cap are left alone — this transform never increases a quantity. Bands carrying negative MW (battery discharge, for example) are left alone too. Only the per-interval quantity grid is changed; the unit's summary price ladder is left untouched, so a unit's summary and per-interval views may look a little inconsistent afterwards.
Limit Band MW is destructive: the scale-down uses integer rounding-down, so the exact original quantities cannot be recovered from what is now in the file, and the new per-interval total may end up a little below your cap because of the rounding. Your original values cannot be recovered — save a copy first. If you might want the originals back, use Save As before running this transform.